
Starting Treatment with Invisalign® Teeth Aligners
- Step 1: If you are interested in Invisalign® treatment the first step is to schedule a consult where we do a thorough clinical examination to be sure you are a good candidate.
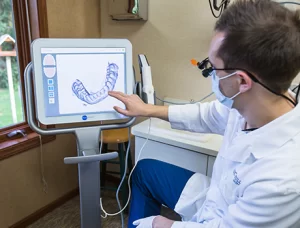
- Step 2: If you are a good candidate for Invisalign® treatment, the next step is to have digital impressions and photographs taken. Our patients love that we use the iTero scanner to create a 3D scan of the teeth instead of the older tray-with-gel method. It keeps them much more comfortable during this process. Using these records, Dr. Hull will come up with a treatment plan to move your teeth to their ideal locations, both functionally and esthetically.
- Step 3: Once the treatment plan is submitted, a ClinCheck will be created for your teeth. A ClinCheck is a digital representation of the movement that will be achieved throughout your Invisalign® treatment. The ClinCheck will show how many clear aligners will be necessary for your treatment.
- Step 4: Once you have gone through the ClinCheck with Dr. Hull, treatment can begin!
When we are presenting the “ClinCheck” there are a few things we make sure the patients are aware of:
- Step 1: Each aligner is worn for two weeks. With each aligner, you get movement that brings you closer to the desired outcome.
- Step 2: You have to wear the aligners at least 22 hours everyday.
- Step 3: We like to see you in the office after every 3 aligner sets (6 weeks) to be sure the aligners are “tracking” ok. If the aligners aren’t seating all the way, it means that the teeth aren’t moving the way we would like. At that point, there are some tricks we can try to get the teeth to track again, or we take a new impression to get new teeth aligners from the Invisalign® lab.
- Step 4: In almost every case “attachments” are used. These are areas of clear composite that we add to certain teeth in order to optimize movement. The trays use the attachments in order to put more idealized forces on teeth to gain the desired movement. We usually add the attachments before the patient receives the 2nd aligners. They are barely noticeable, unless someone gets incredibly close to the person wearing these clear composite materials. After treatment, the attachments are removed, and the teeth are polished. No damage is done to the teeth.
- Step 5: In some cases we use IPR (interproximal reduction) in order to get our desired outcome. With IPR we slenderize specific teeth by 0.05mm to 0.25mm so that they don’t “bump” into one another while we are trying to move them. This can also create more room in case there is crowding of the dentition.
- Step 6: After treatment, retention is incredibly important. Once we have achieved the desirable outcome we want to be sure teeth don’t move back towards their original positions. For this we recommend Vivera Retainers. You can think of a Vivera Retainers as a reinforced Invisalign® tray. For each order, you get a set of 4 trays. You wear each try for about a year before switching to a new one.
- Step 7: At the end of a case, we sometimes we go through a “refinement” period where we want to make small improvements to achieve the ideal outcome. For this phase of treatment, we simply take new impressions and get new aligners from the Invisalign® lab. Once the patient is happy with the end result, we then move to the Vivera Retainers.
Talk to Us About Invisalign® Treatment in Comstock Park!
If you have any unanswered questions, you can call our office in Comstock Park to learn more. Our highly-trained staff can help you find out more about this innovative treatment and whether it is right for you! Call if you are in the Grand Rapids area.
